My SD card suddenly stopped working after I removed it from my camera, and now it says the card is corrupted and needs to be formatted. It has important family photos on it that I haven’t backed up yet. I need advice on safe SD card photo recovery steps and whether there’s a way to recover pictures before formatting the card.
I learned this the annoying way. An SD card will look normal, then out of nowhere it flips to unreadable. I’ve had it happen after a camera froze, after a transfer got cut off, after the battery died mid-recording, and once from pulling the card too fast. No warning, no grace period. One second your files are there, next thing the device throws a corruption error before you’ve copied a single thing.
The part people miss is this. A corrupted SD card does not always mean the photos, videos, or docs are gone. A lot of the time the mess is in the file system, not in the files themselves.
So first thing, do not accept the repair prompt right away. If Windows, Android, your camera, or anything else tells you to format the card, stop there. Don’t hit yes because you want the card working again. If your files matter, recovery comes first.
That’s the order I use every time. Pull the data off first. Fix the card later.
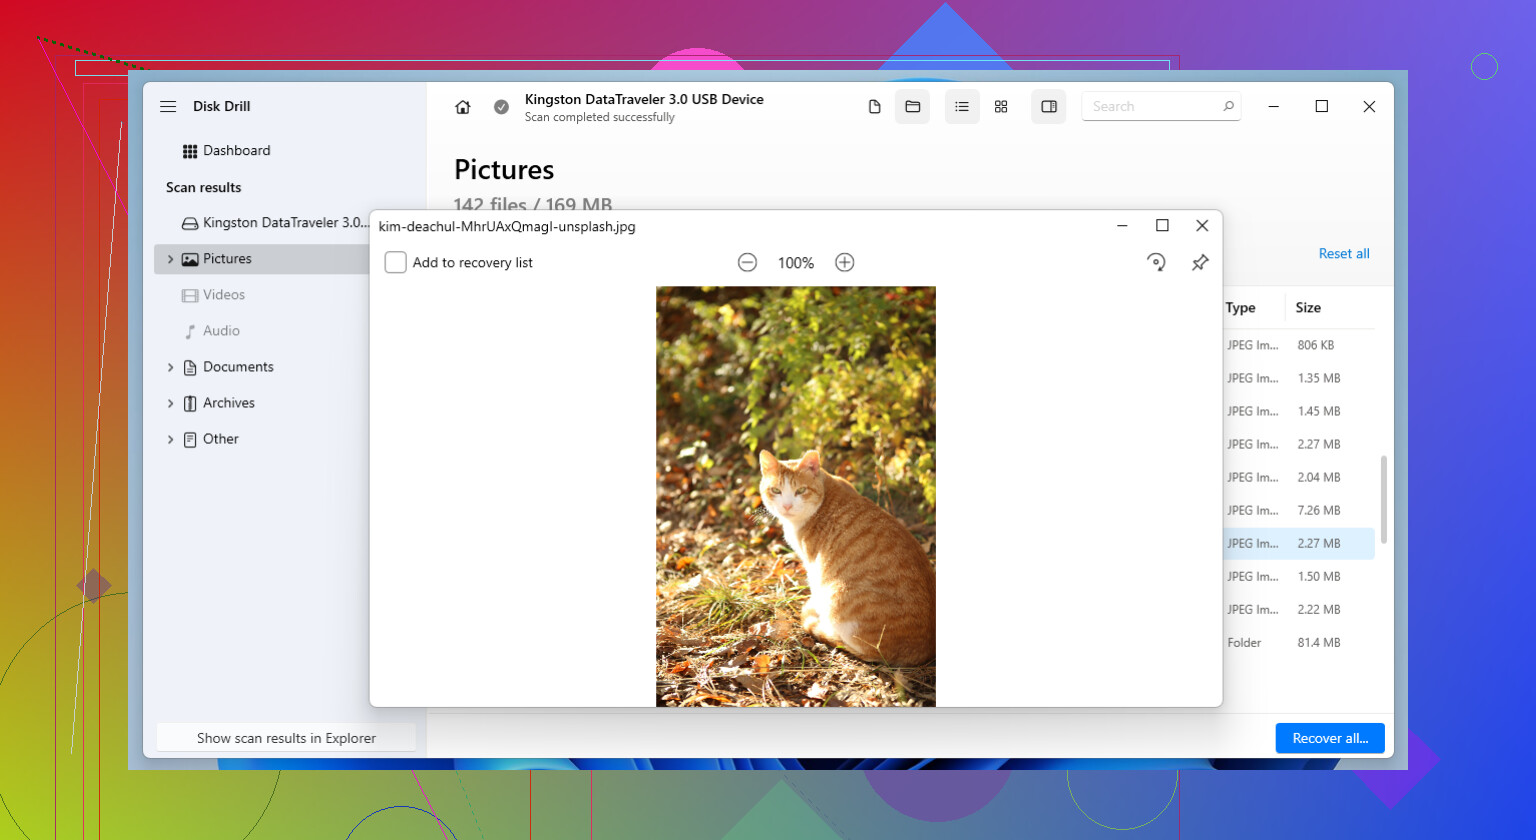
I usually start with Disk Drill. It’s been decent for ugly card failures, and the part I like most is the byte-for-byte backup option. I make an image of the card, then scan the image instead of hammering the original SD card over and over. Less risk, less stress. Once the recovered files are copied somewhere else and I’ve checked a few of them so I know they open, then I mess with the card itself.
Method 1: Run CHKDSK First
This is the plain Windows fix. CHKDSK is for file system damage, not dead hardware. If the card suddenly won’t open, throws errors, or asks to be formatted, this is where I’d start.
Steps:
1. Put the SD card in your PC.
2. Open File Explorer and look at the drive letter for the card.
3. Search for Command Prompt in the Start menu.
4. Right-click it and pick Run as administrator.
5. Type chkdsk X: /r and swap X for the SD card’s letter.
6. Press Enter and let it finish.
Big cards take a while. I’ve seen it sit there long enough to make me think it froze, then it finished fine. If the damage is in the file system records and not in the memory itself, CHKDSK sometimes brings the card back with no extra work.
Method 2: Try TestDisk for a Missing Partition
If CHKDSK does nothing, or the SD card shows up as unallocated space, missing capacity, or no partition at all, I move to TestDisk.
This tool goes after the partition structure. Different problem, different fix. Sometimes the files are still sitting on the card, but the map pointing to them is broken. TestDisk is ugly as sin, old-school menu stuff, but I’ve seen it rescue cards I wrote off.
Steps:
1. Download and open TestDisk.
2. Pick the affected SD card from the drive list.
3. Use the partition table type it suggests.
4. Select Analyze.
5. Run Quick Search.
6. Check the partitions it finds.
7. If the missing one looks right, choose Write to restore the partition table.
8. Restart the computer if it asks.
The interface feels like it escaped from 2006, but I’d still keep it around. It does one job well.
Method 3: Format the Card
If neither of the first two methods gets the card back into a normal state, formatting is the last repair step.
By then, your files should already be recovered and saved somewhere else. At this stage you are not trying to save data. You are trying to rebuild the file system so the card becomes usable again.
Steps:
1. Open File Explorer.
2. Right-click the SD card and choose Format.
3. Pick exFAT unless your device needs something else.
4. Leave allocation unit size on Default.
5. Click Start.
6. Wait for Windows to finish.
If the format works and the card behaves after, the issue was likely logical corruption. If it starts corrupting again even after a clean format, I stop trusting it. At that point I assume the memory is wearing out. I’ve tried giving cards a second chance before. Bad idea. Once they start acting weird more than once, I replace them and move on.
3 Likes
Do not write anything new to the card. That includes format, repair, or taking more photos. Every write lowers your odds.
I differ a bit from @mikeappsreviewer on CHKDSK. I would not run it first if the photos matter a lot. CHKDSK fixes file system damage by changing metadata. Sometimes it helps. Sometimes it moves things around and makes photo recovery messier. For family photos, I’d do read-only recovery first.
My order:
-
Try a different card reader and a different USB port.
A bad reader causes fake corruption errors more often than people think. -
Test on one other computer.
If one PC sees it and another doesn’t, your issue is not always the card. -
If the card mounts, copy everything with a file copy tool that retries reads.
TeraCopy on Windows is decent for flaky media. -
If it does not mount, scan it with Disk Drill or PhotoRec.
Disk Drill is easier to sort through for photos, and it handles damaged SD cards better than a lot of free tools in my expereince. PhotoRec is free and strong, but filenames and folders often come back messy. -
Recover to your hard drive, never back to the SD card.
A few extra checks.
If your camera saved RAW, look for those too, not only JPG.
If the card gets hot, disconnect it. That points to hardware failure.
If the computer asks to initialize the disk, hit no.
If the photos are once-in-a-lifetime stuff, stop DIY after one clean scan and send it to a recovery lab. Repeated scans on a dying card are how people turn bad into worse.
If you want a plain-English read before using it, this Disk Drill review covers recovery, imaging, and what it does well on damaged cards,
see how Disk Drill performs for SD card photo recovery
After recovery, retire the card. Corruption tends to come back. Thats the part people hate hearing, but old cards are cheap, lost photos are not.
Don’t format it yet. That prompt is basically the trap everyone clicks once and regrets later.
I mostly agree with @mikeappsreviewer and @kakeru on avoiding writes, but I’m a little less eager to “fix” the card before I know the photos are safe. My first move is to treat the SD card like it’s fragile hardware, not just a messed-up file system.
What I’d do that hasn’t really been stressed enough:
- Slide the little lock switch on the SD adapter if you’re using one. It’s not perfect, but it can help prevent accidental writes.
- Check whether the card shows the correct size in Disk Management. If the capacity is wildly wrong, like 32GB showing as a few MB, that smells more like controller failure than simple corruption.
- If the card is microSD, try it in a phone or camera only to see if it reads, not to let the device “repair” it. Some readers are just flaky.
If the card is detected at all, make an image first, then recover from that image. Disk Drill is solid here because imaging and photo recovery are both easy to do without getting too deep into nerd stuff. I know some people jump straight to CHKDSK, but for irreplaceable family pics I would rather preserve the current state first. CHKDSK can help, sure, but it can also make later recovery uglier. Been there, did the dumb thing.
Also, look for hidden recovered folders like FOUND.000 after any failed repair attempts. Sometimes bits of files end up there.
And if the card disconnects randomly, gets hot, or vanishes mid-scan, stop messing with it. That’s when DIY starts becoming how people lose the rest of the data.
If you want a walkthrough, this step-by-step guide to fix a corrupted SD card and recover photos covers the basic process pretty well.
One more thing, even if you recover everything and the card seems “fine” after formatting, I wouldn’t trust it agian for family photos. Retire it.
I’m with @kakeru and @espritlibre on one thing: assume the card is unstable, not just “corrupted.” Where I slightly disagree with @mikeappsreviewer is timing. Repair tools are fine later, but if the card keeps dropping off the system, the better move is to grab a full image first and work from that copy only.
A couple things not stressed enough:
- Check Event Viewer or system logs while plugging it in. If you see repeated I/O or controller reset errors, that points more to hardware trouble than simple file system damage.
- On Linux or macOS, a read-only mount attempt can sometimes expose files when Windows just throws the format prompt.
- If the card reader has a write-cache option enabled, disable it before testing. Sudden removal sometimes leaves metadata half-written.
About Disk Drill since it came up:
- Pros: very easy previewing, good photo carve results, imaging is built in, less intimidating than PhotoRec/TestDisk.
- Cons: deeper scans can be slow, recovered filenames/folders are not always preserved, and if the card is physically failing it still can’t do miracles.
My order would be: verify detection and true capacity, make an image if possible, scan the image with Disk Drill or another recovery tool, then only consider repair attempts after your photos are safe elsewhere.
Also, if any recovered JPEGs look broken, keep them anyway. Partial files can sometimes be repaired later.