My external drive suddenly changed from NTFS to RAW after a disconnect, and now Windows says I need to format it before I can use it. It has important files on it, so I’m trying to find the safest way to repair or convert a RAW drive to NTFS without data loss. If you’ve dealt with RAW to NTFS recovery, what worked for you?
I wouldn’t jump straight from RAW to NTFS if there’s anything on the drive you care about. Once Windows shows a drive as RAW, it usually means it no longer sees a valid file system at all. This isn’t like FAT32 where a simple conversion sometimes works. What I’d do is recover the files first, then rebuild the drive.
Here’s the order I’d follow.
Step 1: Stop writing to the drive
I’d leave it alone for now. No formatting, no CHKDSK, no DiskPart repair attempts. All of those write changes to the disk, and if the file system is already damaged, you make recovery harder fast. I’ve seen people lose the easy recovery route by trying to “fix” it first.
Step 2: Pull your files off before doing anything else
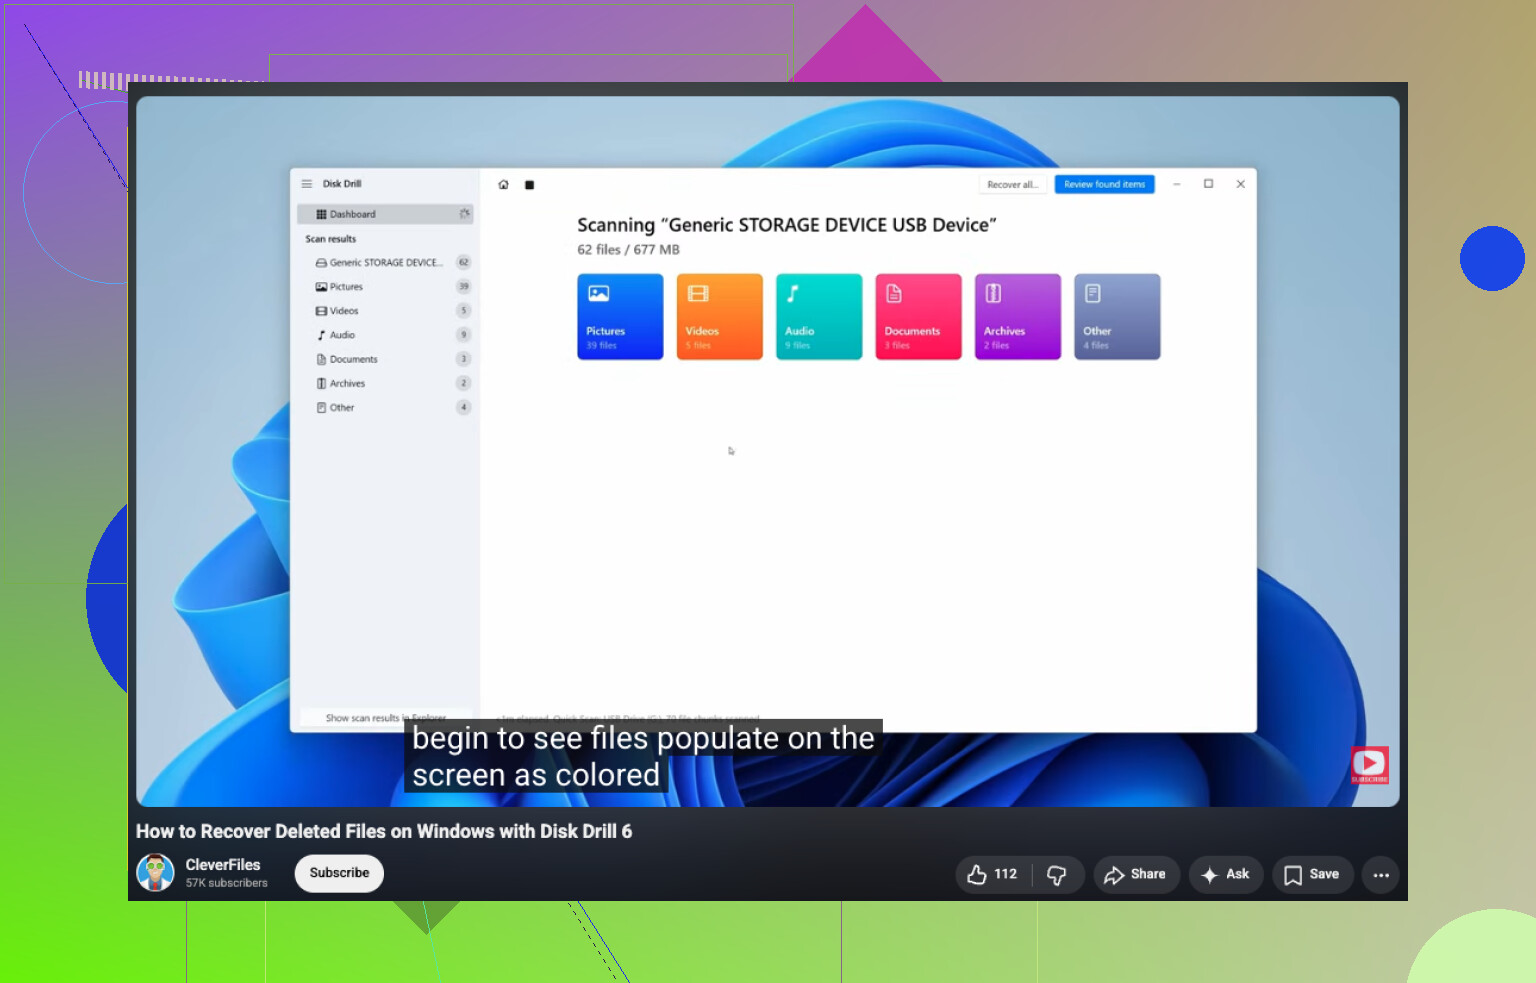
If the drive still shows up in Disk Management with the right size, I’d start there and scan it with Disk Drill.
The steps are simple enough:
- Install Disk Drill on a different drive, not the RAW one.
- Plug in the RAW USB drive, SSD, or external hard drive.
- Select the RAW disk and hit Search for Lost Data.
- Let the scan finish fully.
- Go through the results by folder, file type, or file name.
- Preview the files you care about.
- Recover them to another storage device.
One thing I liked about Disk Drill is the Windows version gives you up to 100 MB of free recovery. More useful than that, scans and previews aren’t blocked, so you get to see what’s there before spending money.
The preview support is decent. Documents, PDFs, photos, videos, audio, archives, and a lot of RAW camera formats showed up fine when I tested similar drives. If a file previews cleanly, I’d treat it as a good sign for recovery.
What helps with RAW disks is Disk Drill doesn’t rely only on Windows being able to read NTFS. It looks for leftover NTFS metadata if any of it still exists. If the file system is too far gone, it also falls back to signature-based recovery for a long list of file types.
If the first scan looks incomplete, I wouldn’t stop there. I’d check the same drive with UFS Explorer or DiskGenius too. Different recovery tools pull different results. I’ve had one tool miss folders another one found with no trouble. Kinda annoying, but it happens.
Step 3: Rebuild the drive as NTFS after recovery
Once your files are copied somewhere safe, then I’d make the drive usable again.
The easy route:
- Open Disk Management.
- Right-click the RAW partition.
- Pick Format.
- Choose NTFS.
- Keep Quick Format turned on.
- Click OK.
If Windows won’t let you format it, delete the RAW partition first, create a new partition, then format the new one as NTFS.
One last thing. If this is an SSD, or the drive keeps dropping offline, throws read errors, or gets slower each time you touch it, I’d recover the data now, not later. If it turns RAW again even after a clean format, I wouldn’t trust it with anything important. At taht point I’d swap the drive out and move on.
3 Likes
I’d be careful with the word “repair.” RAW often means Windows lost the file system map, not the files. @mikeappsreviewer is right about avoiding writes first, but I don’t fully agree with skipping every repair path forever. If the drive is healthy and the damage is only logical, a read-only test with TestDisk is worth a shot before you wipe anything.
My order would be:
-
Check SMART health with CrystalDiskInfo.
If health is bad, stop. Clone the drive first with something like HDDSuperClone or ddrescue. -
Try a read-only partition repair scan in TestDisk.
Do not write changes unless the found NTFS structure looks correct. -
If the folder tree matters, scan with Disk Drill.
It tends to pull better filenames and folders than raw carving alone. Recover to a diffrent drive. -
After your data is safe, format back to NTFS.
If you want a solid guide on Windows file recovery, this helps:
how to recover deleted files on Windows
One more thing. If the enclosure or USB cable glitched during disconnect, test the bare drive in another enclosure or SATA port first. I’ve seen the adapter be the whole problme.
I’d split this into two seperate questions: is the file system broken, or is the USB bridge/cable lying to Windows?
That’s the one part I think @mikeappsreviewer and @sognonotturno only touched lightly. I’ve had externals show up as RAW, then read perfectly once I changed the cable, power adapter, or enclosure. Cheap USB-SATA boards fail all the time. If this is a desktop-style external with its own power brick, test that too.
What I would do before any repair attempt:
- check Event Viewer for disk/ntfs/usbstor errors
- try another PC
- try another USB port, preferably rear motherboard ports
- if possible, remove the drive from the enclosure and connect it directly by SATA or a known-good adapter
- listen for weird clicks, spin-up/spin-down loops, or pauses
Also, slight disagreement with the “maybe repair first” camp: if the data is actually important, I would image the drive before experimenting. Even healthy-looking drives can go downhill fast after a disconnect event. A sector-by-sector clone/image gives you one less way to get burned.
If the drive is stable enough to read, recover from the image, not the original. That’s where Disk Drill is still useful, especially if you want the best shot at keeping filenames and folder structure instead of just raw file carving. I’ve seen it do better on damaged NTFS than Windows tools, and that matters a lot when you need actual organized files back from a corrupted external drive.
After the files are safe, then wipe the partition table, make a fresh NTFS volume, and fully test the drive. Not quick test. Real test. If it goes RAW again, bin it. Harsh, but yeah, I would not trust it agian.
If you want extra reading on recovering files from a corrupted drive on Windows, that covers the same basic idea in a simpler way.

I’d push back on one thing: “repair” is often the wrong mindset. RAW after an unsafe disconnect can be a metadata problem, but it can also be the first sign of marginal hardware. That’s why I’d treat this like a diagnosis job first, not a conversion job.
What I’d add beyond what @sognonotturno, @boswandelaar, and @mikeappsreviewer already covered is checking whether the partition start offset got mangled. I’ve seen NTFS volumes appear RAW simply because the partition entry no longer points to the right place, while the actual NTFS boot sector and MFT are still there. In that case, file recovery software works, but a proper partition table correction can sometimes bring the volume back without touching file contents. The catch is you only do that after you verify the layout matches exactly.
Another angle people skip: compare what Disk Management reports versus what a hex viewer or partition tool sees in sector 0 and the NTFS boot sector area. If sector 0 looks wrong but the backup NTFS boot sector is intact, that tells you a lot about whether this is logical corruption or something uglier.
On Disk Drill specifically:
Pros
- very good at rebuilding folder trees on damaged NTFS
- previews help you judge file integrity before recovery
- easier to use than a lot of forensic-style tools
Cons
- not the cheapest option if you need full recovery
- deep scans can return duplicate or messy results
- not my first pick for fixing partition metadata itself
So yeah, I’d use Disk Drill for extraction if the structure matters, but not as the thing that “repairs” RAW to NTFS. Recover first, inspect later. If the drive passes a long surface read test after that, maybe reuse it. If it flakes once more, retire it. RAW twice is usually enough evidence for me.